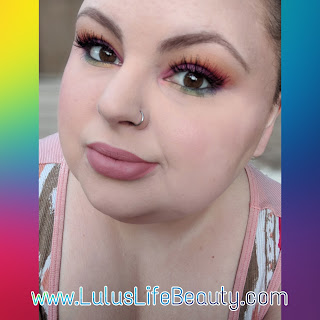
Hello everyone and welcome back to my blog! Also, welcome to June, which is Pride Month! The month where you celebrate who you are and what you stand for! Another large part of pride month is the rainbow, all the colors of the rainbow, acceptance of every one no matter what their sexual orientation. I have friends and family who are gay, bisexual or lesbian who aren’t accepted for who they are. It’s such an awful experience to see someone you care about, not being treated like everyone else is. In honor of pride month I decided to do a rainbow Eyeshadow tutorial. I know this is nothing original, but I love the way this look turned out! I hope you enjoy!
Starting out this look, I primed my eyelids and set them with setting powder. When doing an ombre sort if look with your eyeshadow, you want to go from lightest to darkest working carefully not to muddy up any of the colors already placed. I used two yellows to start out, one a pale inner banana color and then a bright yellow. I took the pale yellow and blended it out almost to the browser, then added the brighter shade a little lower. That’s why I did with all the shades. I slightly overlapped all of them to create the ombre. Next going in with the orange I kept it lower but still brought it in pretty far. Onto the red, I focused it mainly in the outer corner. Over the orange it just kept looking more orange. I couldn’t get it to look red. So I transitioned into the bright purple on the middle of the lid, fading it into the pinks I used. I made sure to pull the pink into the inner corner to connect with the lower lash line later. On the bottom lash line I started with the dark purple, blended it into the blue, then into the two greens and finally connecting yellow in the inner corner with the pink to make an orange. I tried to make it look like it was one blended ombre all around the eye.
That’s it for my tutorial today! Did you like it? Let me know down below. I personally love this look. I paired it with a nude lip and a set of false lashes! I wanted to keep the lips nude so the focus stayed on the eyes. I also felt that lashes pulled the whole look together. Without lashed it seemed a bit lacking. So I decided they were needed lol. Everything I’ve used is listed below! I listed two foundations, I use half and half to get my color! If you have any questions, feel free to ask me in the comments! One question I have for you guys is, if I made YouTube videos, would you watch and subscribe?!
Xoxo Lulu
Xoxo Lulu
Products used today.
Eyes:
Hard Candy Eyeshadow Primer
BH Cosmetics Take Me Back To Brazil palette
Essence Kajal Eye Pencil, Black
Maybelline The Rocket Mascara, Waterproof in Black
Broadway Beauty eyebrow pencil, brown / black
Duo Eyelash Glue
Ardell Wispies False Lashes
Eyes:
Hard Candy Eyeshadow Primer
BH Cosmetics Take Me Back To Brazil palette
Essence Kajal Eye Pencil, Black
Maybelline The Rocket Mascara, Waterproof in Black
Broadway Beauty eyebrow pencil, brown / black
Duo Eyelash Glue
Ardell Wispies False Lashes
Face:
Maybelline Pore Eraser Primer
Revlon Colorstay Foundation, 200 Nude
Maybelline Matte & Poreless, 110 Porcelain
Coty Airspun Face Powder, Naturally Neutral
Elf Contour Palette, light
E.L.F. Cosmetics Makeup Mist & Set
Blush, it's one I made myself!
Maybelline Pore Eraser Primer
Revlon Colorstay Foundation, 200 Nude
Maybelline Matte & Poreless, 110 Porcelain
Coty Airspun Face Powder, Naturally Neutral
Elf Contour Palette, light
E.L.F. Cosmetics Makeup Mist & Set
Blush, it's one I made myself!
Highlight:
BH Cosmetics Carli Bybel palette, nude shade
BH Cosmetics Carli Bybel palette, nude shade
Lips:
L.A. Colors Matte Liquid Lipstick, Vixen
L.A. Colors Matte Liquid Lipstick, Vixen
Brushes / Tools:
Real Techniques Miracle Complexion Sponge
Pueen Large Powder Brush
Pueen Angled Blush Brush
Pueen Flat Shader Brush
Elf Defining Eye Brush
Elf Eyeshadow Brush
Elf Flat Contour Brush
Generic Brand Fan Brush
Generic Blending Brush
Generic Natural Fiber Blending Brush
Find me elsewhere:
Youtube: https://www.youtube.com/user/LINDAxHELLA
Twitter: https://twitter.com/Luluslife_blog
Instagram: https://www.instagram.com/lindaxhella/
Facebook: https://www.facebook.com/Lulus-Life-Blog
Pinterest: https://www.pinterest.com/lindaxhella/pins/
Tumblr: http://lindaxwoods.tumblr.com/


