Showing posts with label pink. Show all posts

Makeup Revolution x Fortnite; Llama Collection

Makeup Revolution x Fortnite Collection

Makeup Revolution x Fortnite; Llama Collection

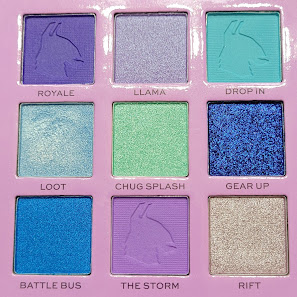
Makeup Revolution and Fortnite dropped a collaboration! I used the Supply Llama palette, mascara and lip gloss. I used a few other pieces from the collection. There's just something about Purple and Teal together that I love! If you enjoyed don't forget to Subscribe to my YouTube channel! 
xoxo Lulu


Makeup Revolution x Fortnite CollectionMakeup Revolution x Fortnite Collection


My go-to base:
Primer: Revolution X Fortnite Supply Llama Dewy Swirl Primer
Foundation: ColourPop No Filter Foundation [fair 05]
Concealer: Too Faced Born This Way Super Coverage Concealer; Cloud
& ColourPop No Filter Concealer; Light 10
Powder: Revolution X Fortnite Peely Banana Light Baking Powder
Bronzer: Revolution X Fortnite Face Palette
Blush: Revolution X Fortnite Face Palette
Highlight: Revolution X Fortnite Face Palette
Setting Spray: Revolution X Fortnite Peely Fixing Spray
Lip Gloss: Revolution X Fortnite Llama Lip Swirl

Tools used from the Collection:
Revolution X Fortnite Trio Sponge Set

Eyes:
Eyeshadow Primer:
Pretty Vulgar Uncaged Eyeshadow Primer
Palette: Revolution X Fortnite Supply Llama 9 Pan Shadow Palette
     - The Storm 
     - Royale 
     - Loot
     - Rift
Eyeshadow Primer: NYX Glitter Primer
Eyeliner: Trestique Eyeliner; Santorini Black Sand
Liner: Revolution X Fortnite Water Activated Liner Palette
Mascara: Revolution X Fortnite Supply Llama Lash Mascara
Brow Pencil: Billion Dollar Brows, Brows On Point: Micro Brow Pencil; Taupe
Brow Gel: ColourPop Brow Boss Gel; Clear

Makeup Revolution x Fortnite; Cuddle Team Leader Collection

Makeup Revolution x Fortnite Collection

Makeup Revolution x

Fortnite Beauty Collection

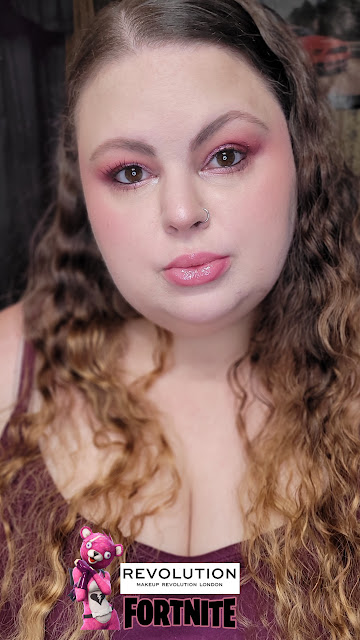
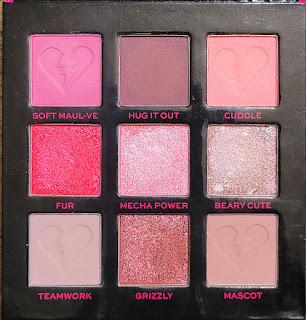
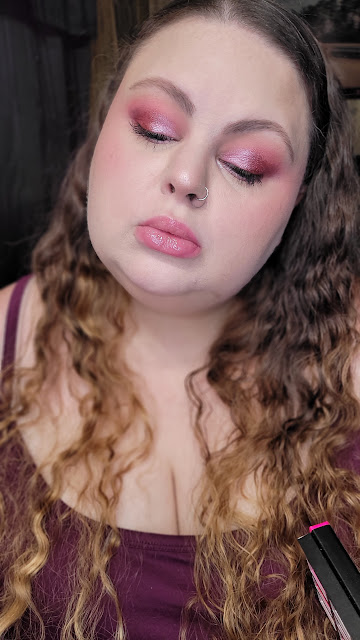
Makeup Revolution and Fortnite dropped a collaboration! Today I used the Cuddle Team Leader, pink items and did a look! I can't wait to create more looks and play in all of the other products!!! Thank you to my boyfriend for surprising me with this collection, I appreciate him so much! The quality on everything so far are amazing! Spoiler, I'm obsessed with the Bronzer / Highlight / Blush palette...
xoxo Lulu

I have videos on my YouTube of all three eyeshadow palette looks!


Makeup Revolution x Fortnite Collection
My go-to base:
Primer:
Revolution X Fortnite Supply Llama Dewy Swirl Primer
Foundation: ColourPop No Filter Foundation [fair 05]
Concealer: Too Faced Born This Way Super Coverage Concealer; Cloud
& ColourPop No Filter Concealer; Light 10
Powder: Revolution X Fortnite Peely Banana Light Baking Powder
Bronzer: Revolution X Fortnite Face Palette
Blush: Revolution X Fortnite Face Palette
Highlight: Revolution X Fortnite Face Palette
Setting Spray: Revolution X Fortnite Peely Fixing Spray
Lip Gloss: Revolution X Fortnite Cuddle Team Leader Pink Shimmer Lip

Tools used from the Collection:
Revolution X Fortnite Character Trio Brush Set
Revolution X Fortnite Trio Sponge Set

Makeup Revolution x Fortnite Collection
Eyes:
Eyeshadow Primer:
Pretty Vulgar Uncaged Eyeshadow Primer
Palette: Revolution X Fortnite Cuddle Team Leader 9 Pan Shadow Palette
- Cuddle
- Soft Maul-ve
- Hug It Out
- Mecha Power
- Grizzly
- Mascot
Eyeshadow Primer: NYX Glitter Primer
Eyeliner: Trestique Eyeliner; Santorini Black Sand
Mascara: Revolution X Fortnite Cuddle Team Leader Cuddle Lash Mascara
Brow Pencil: Billion Dollar Brows, Brows On Point: Micro Brow Pencil; Taupe
Brow Gel: ColourPop Brow Boss Gel; Clear


James Charles Palette | Skip & Artistry Tutorial

James Charles Palette | Skip & Artistry Tutorial


Hello everyone and welcome back to my website! Today I have another makeup tutorial for you in the form of a YouTube video! I have been really enjoying filming and I hope you're enjoying the videos and update in content. I'm sorry I keep using the new James Charles palette, but IT'S SO GOOD!!!!! I will try to switch up some more products for the next look and probably film that as well. As much as I love writing, i've been finding filming so much fun. I bet you're enjoying being able to visually see how i'm doing my makeup, rather than reading. If you prefer to read, rather than watching a video, let me know in the comments down below! I'm new to filming and editing so just give me some time to get better. I just discovered how to add text to the clips. I'm using Windows Movie Maker, It's simple and free. I'll eventually upgrade to something with more effects and pizzazz!
Xoxo Lulu


 Here I have all of the shades that I used, Marked with little  purple hearts for reference!

Products used today.
Eyes:
Wet n Wild Photofocus Eyeshadow primer
Morphe x James Charles Palette
Essence Kajal Eye Pencil, Black
Broadway Beauty eyebrow pencil, brown / black
Maybelline Great Lash Mascara; Clear (Brows)
Maybelline Great Lash Mascara; Waterproof; Black

Face:
Nivea Creme (For moisture and primer) (before recording)
Wet n Wild Photofocus Foundation; Nude Ivory
Makeup Revolution Conceal & Full Coverage Concealer; C3
Makeup Revolution Baking Powder; Lace
Elf Contour Palette
Ulta Beauty Blushes; Tiger Lily & Flush
Mario Badescu; Facial Spray With Aloe, Herbs and Rosewater

Highlight:
Wet n Wild; Mega Glow, Precious Petals

Lips:
Maybelline Color Sensational, Romantic Rose

Brushes / Tools:
Generic Natural Fiber Blending Brush
Generic Flat Small Cream Brush
Generic Blending Brush
Real Techniques Foundation Sponge
Pueen Large Powder Brush
Pueen Angled Blush Brush
Elf Highlighting Brush

Fuschia Rush Makeup Tutorial; Makeup Revolution

Makeup Revolution Iconic Newtrals 2
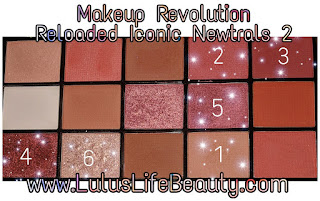
Hello everyone and welcome back to my blog! Today I have this beautiful tutorial to share with you. I am so obsessed with this look. It’s bright, shiny and stunning. Not to mention the pallet I used today, is $7.00…. Yes, seven dollars. The eyeshadows are all super pigmented, buttery and blend like a dream. I have no clue why I don’t use it more often. Makeup Revolution kills it with their palettes! The palette I used today is their Reloaded Iconic Newtrals 2. I bought it from Ulta a few months back and I’m so happy with my purchase. There’s 11 matte shadows (some look like they have shimmer, but it doesn’t show on the lid) and there are 4 buttery almost metallic shades. Okay, enough obsessing over this palette and let’s get into this tutorial!
Makeup Revolution Iconic Newtrals 2


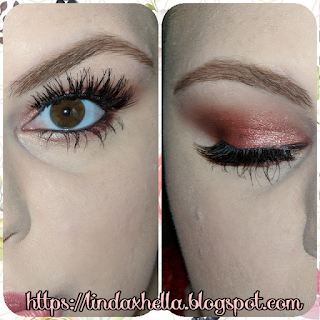
To start this look, I did all of my face makeup first, so I primed and set my lids with my foundation and setting powder. Everything is listed down below as always. Since my lids were already set, I went in with the shade I marked as 1. This is a light warm tan color, I always blend higher that’s your “supposed to” because I have hooded eyes. With shades 2 and 3, I did the same thing and went in my crease with them. Keeping each darker shade slightly lower than the one before. Shade 2 is a pure rusty orangey red. Shade 3 is a darker brick red. I kept shade 3 more towards the outer corner. Now for the metallic buttery shades. I literally used my fingers to apply them at first. I put shade 4 just on the outer third, it’s a dark burgundy almost brick color. Shade 5 I put from the inner corner all the way to shade 4 and patted them together to blend them. Shade 5 is probably my favorite eyeshadow in this palette, it’s a hot pink / fuschia color that is so stunning and blinding! To soften up all the edges, I took a little of the lid shades and patted the edges out and also brought them on the lower lash line. For the inner corner and brow bone, I used shade 6, a pale nudey pink that’s super glowy.


Makeup Revolution Iconic Newtrals 2 That’s it for today’s makeup tutorial! I had a lot of fun with this one. I dumped a bunch of makeup on the living room floor and sat there and just played in makeup. I haven’t done something like that in a long time. It’s my happy place, some of y’all know I have some serious anxiety and take medicine for it. I still get anxious, panicked, I freak out inside. But when I sit down with makeup and focus on something I love doing so much, it calms me. I feel okay and I feel normal. Some people don’t get it. But hey, it’s for me to get and some to understand. Not everyone gets what I’m going through daily, if you do then hey, let’s chat in the comments! Thanks for stopping by, I appreciate you.
Xoxo, Lulu.

PS: Enjoy the narcissistic snapchat filter :)


Products used today.
Eyes:
Makeup Revolution Iconic Newtrals 2
Essence Kajal Eye Pencil, Black
Maybelline The Rocket Mascara, Waterproof in Black
Broadway Beauty eyebrow pencil, brown / black
BH Cosmetics, BH Liquid Eyeliner, Black
Ardell Wispies False Lashes
Duo Lash Glue

Face:
Bare Minerals Custom shade Foundation
Coty Airspun Face Powder, Naturally Neutral
Elf Contour Palette, light
E.L.F. Cosmetics Makeup Mist & Set
Blush, it's one I made myself!

Highlight:
BH Cosmetics Carli Bybel palette, (the two lighter highlights)

Lips:
La Colors Matte Liquid Lipstick, Vixen

Brushes / Tools:
Real Techniques Miracle Complexion Sponge
Pueen Large Powder Brush
Pueen Angled Blush Brush
Pueen Flat Shader Brush
Elf Defining Eye Brush
Elf Eyeshadow Brush
Elf Flat Contour Brush
Generic Brand Fan Brush
Generic Blending Brush
Generic Natural Fiber Blending Brush

Find me elsewhere:
Youtube: https://www.youtube.com/user/LINDAxHELLA
Twitter: https://twitter.com/Luluslife_blog
Instagram: https://www.instagram.com/lindaxhella/
Facebook: https://www.facebook.com/Lulus-Life-Blog
Pinterest: https://www.pinterest.com/lindaxhella/pins/
Tumblr: http://lindaxwoods.tumblr.com/


Think Pink Makeup Tutorial

Think Pink Makeup Tutorial


Think Pink Makeup Tutorial
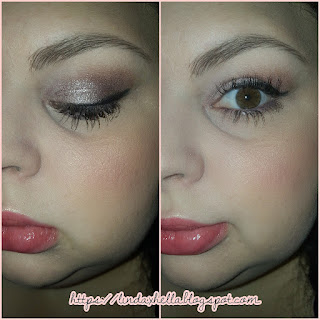
Hello everyone and welcome back to my blog! Today I'm bringing you a beautiful pink and burgundy eyeshadow look i did with one of my new palettes, Makeup Revolution Reloaded Iconic Newtrals 2. I got this about two weeks ago and this is my first tutorial using it. A little review is included in the tutorial along with how to achieve the look! I did end up using a lot more shades than I really needed to, but that was because I did a lot of blending and gradients. By the way, I know my lashes are wonky. They  wouldn't sit right, this is only my second time ever using them though lol. Now let's get into this tutorial.


Think Pink Makeup Tutorial
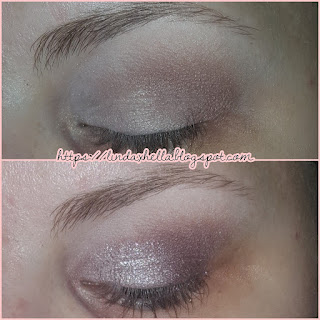
To prime my eyelids I used my Hard Candy Eyeshadow primer I've used for years, it's so good. I have never had an issue with creasing and I have oily eyelids. I went ahead and numbered the shades since they aren’t named, I find that makes it easier to follow along. To set my lid, I did as I normally do and used shade 1, the light bone shade and put it all over. This look is pretty simple to do, but it uses a lot of shades. In the crease I took shade 2 and brought it from outer corner to about half way in. These shadows are very pigmented, so I only used a little bit of it to create a hazy warm crease. On the eyelids with a packing brush I used shadows marked as 3, 4 & 5 in that order and patted them on my lid from inner corner with the lightest, to the outer corner with the darkest. With a clean blending brush, I went in the crease to soften any of the harsh lines. I also took the same three lid shades and blending them on my bottom lash line. On the very inner corner and brow bone, I used shade 6. That’s all I did to achieve this look and I love it. There’s so pink and burgundy loveliness, it gives me all the feels!


Think Pink Makeup Tutorial

Thank you so much for stopping by to check out this tutorial. I hope you loved it as much as I do! Let me know if you can see a difference in the photo quality and if it’s better or worse. I’m using something different for my photos and I’m not sure if they’re better or worse. All of the makeup products, tools and social media links will be down below! Please feel free to share this with your friends if they’re looking for inspiration.
Xoxo Lulu


Products used today.
Eyes:
Hard Candy Eyeshadow Primer
Makeup Revolution Iconic Newtrals 2
Essence Kajal Eye Pencil, Black
Broadway Color Lengthening Mascara, Black
Elf  Eye Brow Kit, Light
Elf Clear Brow Gel
Ardell Wispies Lashes

Face:
Dermacol Foundation Cover, 210
Maybelline Matte n Poreless Foundation, Porcelain
Coty Airspun Face Powder, Naturally Neutral
Elf Contour Palette, light
E.L.F. Cosmetics Makeup Mist & Set
Blush, it's one I made myself!

Highlight:
Revolution Liquid Highlight, Champagne

Lips:
Makeup Revolution, Iconic Matte Nude, Lust
(Shade “3” in eyeshadow palette patted on top)

Brushes / Tools:
Real Techniques Miracle Complexion Sponge
Pueen Large Powder Brush
Pueen Angled Blush Brush
Pueen Flat Shader Brush
Elf Defining Eye Brush
Elf Eyeshadow Brush
Elf Flat Contour Brush
Generic Brand Fan Brush
Generic Blending Brush
Generic Natural Fiber Blending Brush

Find me elsewhere:
Youtube: https://www.youtube.com/user/LINDAxHELLA
Twitter: https://twitter.com/Luluslife_blog
Instagram: https://www.instagram.com/lindaxhella/
Facebook: https://www.facebook.com/Lulus-Life-Blog
Pinterest: https://www.pinterest.com/lindaxhella/pins/
Tumblr: http://lindaxwoods.tumblr.com/


Pink Summer Makeup Tutorial

Pink Summer Makeup Tutorial

Pink Summer Makeup Tutorial
Hey guys and welcome back to my blog! Today I want to do a fun tutorial using a pop of pink on the lid! I don't know what it is, but recently I’ve loved wearing pink on my eyes. That’s something I would have never done a few months ago. I'm really starting to express myself through my makeup! I'm loving it. It’s just fun and bright for summer! I’m going to go through all of my makeup and see what I’ve got to work with! This should be interesting! Also, I've had requests to film myself doing makeup, so I’m going to take a crack at it and see how it goes. If I film this look, I'll have the link down below! (Didn’t film is, oops.)


Makeup Revolution Redemption Eyeshadow Palette Iconic 3
After a quick look through all of my palettes, I decided to go with the Makeup Revolution Redemption Eyeshadow Palette in Iconic 3. This palette has a lot of the pink shades I was looking for! To start out this look I primed my lids with the hard candy eyeshadow primer and set it with the matte cream shade (1). After that I warmed up my crease and defined it using a warm taupe (2). For the lid I used the three shimmery metallic pinks on a wet brush to intensify their pigmentation. On the middle if the lid I used a bright warm pink (3) faded to the dark pink / burgundy (4) shade in the outer corner. On the inner corner I used the pale frosty pink (5) to brighten up the eyes. To deepen the crease and blend the outer corner to middle of the crease I went in with a dry fluffy brush into a dark taupe purple (6) and back into shade 1 to soften the inner corner to middle of the crease. That’s it for the eyeshadow! It was so simple and beautiful! For this look I went with black in the tight line and water line and decided not to do a wing. I wanted to keep this look nice and bright. I still had to use back in the water lines because I don’t have a nude pencil and while doesn’t look right, it was too bold and took away from the eyelids.


Makeup Revolution Redemption Eyeshadow Palette Iconic 3

Products used today.
Eyes:
Hard Candy Eyes the Limit Eye Shadow Primer
Makeup Revolution Redemption Eyeshadow Palette Iconic 3
Broadway Beauty Eyebrow pencil, Black / Brown
Broadway Colors Lengthening Mascara in Black
Rimmel Scandaleyes Waterproof Pencil, Sparkling Black

Face:
Maybelline Baby Skin Instant Pore Eraser Primer
Maybelline Fit Me Matte + Poreless Foundation, Porcelain 110
Revlon Colorstay Combo / Oily, in 200 Nude
Ulta Full Coverage Concealer, Light Cool
Coty Airspun Face Powder, Naturally Neutral
L.A. Girl Pro Setting Powder, Translucent
DIY Glowy Blush
NYC Smooth Skin Bronzing Powder, Sunny
Carli Bybel Highlight, Light nude shade
E.L.F. Cosmetics Makeup Mist & Set
Lips: Maybelline Color Sensational, Born With It

I hope you love this makeup look as much as I do. It’s so light and summery looking, it could easily become an everyday makeup look! I’m sorry I’ve been absent from blogging, I’ve had a lot of self doubt and lack of inspiration the last three weeks and in finally figuring out that everyday I waste is a day I’m not succeeding in life! This is something I love to do and shouldn’t feel ashamed to do it. I’ve wasted too many weeks feeling doubtful. I’m over it! Thank you so much for checking out this tutorial and I hope if you have any comments or suggestions you’ll leave them below!

Xoxo Lulu

Ps: Here’s some other places to find me online!

Twitter: https://twitter.com/Luluslife_blog
Instagram: https://www.instagram.com/lindaxhella/
Facebook: https://www.facebook.com/Lulus-Life-Blog
Pinterest: https://www.pinterest.com/lindaxhella/pins/
Tumblr: http://lindaxwoods.tumblr.com/


Pink Sparkly Eyeshadow Tutorial


Pink Sparkly Eyeshadow TutorialHey guys, the last few weeks of actually playing in my Ulta box, I’ve discovered that the glitter shades are actually really pretty on the eye. I decided to use them today because I was feeling a little sassy I guess lol. I promise, this will be the last post using this makeup box for a while since I know you can’t buy it anymore. But I know Ulta sells their own range of singles. I think some of these are part of their range.


The Ulta Be Discovered 67 piece Collection
To start out this look, I used my trusty Hard Candy Eyeshadow Primer all over the lid and set it with the shade Au Natural. I thought that shade would be too dark, but it actually matched my skin perfectly. I lightly tapped into Brave and Camel, running them lightly through the crease and put her corner, just to bring in warmth and some depth. On the lid, I tapped on In The Buff, but it hardly showed up at all. So I rolled with it and went into the bottom drawer of colors and used the Color Coat in Platinum, it’s a thick cream shadow that kind of drags on the lid. I just used it as a base across the eyelid and packed on the glitter shade Pretty Princess on the inner two thirds and Glam Rock on the outter third. Then I took my blending brush and softened all the edges and added a little Havana Nights in the outter corner the help blend things out.

The Ulta Be Discovered 67 piece Collection

The Ulta Be Discovered 67 piece CollectionFor eyeliner I used the purple eyeliner that came in the box set, it wasn’t very pigmented soon used a little of that same dark purple just to smudge under the outter half of my lash line. On the top lash line I used the same purple liner and set it with a black shadow. Recently I've been taking the liner two thirds on my lash line, it makes my eyes look bigger, which I love the look of. For my brows I used the Broadway Beauty Eyebrow pencil in Black / Brown and the Broadway Colors Lengthening Mascara in Black. Those two have become some of my favorites. To finish off my face makeup, I used my cover girl 3 in 1 foundation, Ulta Full Coverage Waterproof Concealer, Coty Airspun Loose Face Powder, Wet n Wild Contouring and Highlight palette, blush and Highlight duo and lip gloss included in the ulta box. I actually really liked the highlight, it was really silky and had great pigment. The gloss had a pretty shine without being sticky and stayed on for an hour or two!
Covergirl, ulta, hard candy, broadway colo, wet n wild,

Thank you so much for checking out this tutorial, I hope you love this look as much as I do. I wore out to Red Lobster for my birthday dinner with my boyfriend and daughter! Might I add, their Cheddar Bay Biscuits give me life! Haha.

Xoxo
Lulu.

How I clean my makeup brushes!


My favorite way to clean my makeup brushes has got to be with organic virgin coconut oil and Dawn dish soap… A lot of people like to use olive oil, but I think it’s much harder to get out of the brushes and makes the task take a lot longer! Now let’s all be honest, how many of us actually clean our brushes out after we use them? Not me, that’s for sure! I don’t have time to do it and it’s not the most fun thing to do. Since I don’t do my makeup as often as I’d like, I only need to wash my brushes twice a month.


You know how putting organic virgin coconut oil in your hair is really good for you hair? Well, coconut oil contains lauric acid, and that’s been known to reduce candida, it fights bacteria, and awesomely enough it also creates a hostile environment for viruses. Are you starting to get why I use it do clean my brushes? It’s going to be a lot better for your skin if there’s any residue of it left in the bristles. When you use Dawn Ultra Concentrated dish soap, it removes all dirt and, oils and germs! If you’re wondering “Why use an oil if you’re going to be using soap anyway?”. Well simply put, it breaks down any powders stuck inside the bristles of the brushes and breaks down creams and liquids that contain oils. Then after you wash the brushes with soap to remove all of the makeup residue and oils. You always want the brushes at a downward facing angle after they have been washed. Always set them down so the water is being drawn down the length of the bristles and out towards the tips. Never set your brushes upright while they are wet. Doing so weakens the glue, rots the wooden handles and makes it a lot easier for bacteria to breed and mold to grow. Now that all of the details and basics have been mentioned, let’s get into explaining my process!

Here’s what you are going to need:
Virgin organic coconut oil.
Your preferred soap.
Your makeup brushes and sponges.
Some paper towels.
Last but not least, something to rest them on.
I usually use two hand towels, one rolled for height and one laid out.

You want to start with a small amount of coconut oil in a microwave safe dish. About a teaspoon worth for twenty or so brushes. Dampen them as you go in warm water, dip the end in a little bit of the oil and swirl the brushes on your hand, between your fingers and really work the oil into the brush. Once you have the oil worked in take your soap and put a drop on your hand and swirl and work the soap in on your hand, massaging the soap in and occasionally squeezing the brush. Repeat that step until the water runs clear. You do this with all of your brushes and sponges until everything is clean. Once you’re done, make sure to gently squeeze out ad much water as possible, then set up your brushes facing down to draw the water out. Let them sit for a few hours or up to a day and you are done!
This is by far the easiest way I’ve ever found for washing my brushes! I hope this post helped you and was informative! If you have any questions, let me know in the comments!


Xoxo
Lulu

Popular Posts