Showing posts with label drugstore. Show all posts

Burnt Orange & Pink Glam

Burnt Orange & Pink Glam

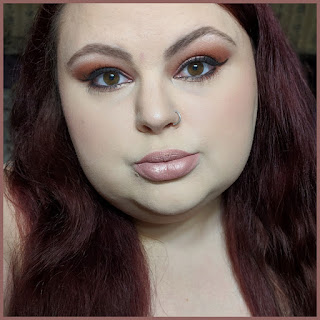
Hello everyone and welcome back to my blog! Today I have for you a warm, smokey simple look. It looks like it's a lot more complicated than it actually is. Don't we all love a simple glam look that looks hard to do than it really is? I know my wings aren't as sharp as a good wing should be. My eyeliner pen is drying out so I had a lot of struggles getting the wing on at all. This look didn't quite look right without a wing, so I had to force the liner pen to work. I messed up the wings and had to fuss with them for a good twenty minutes, lol. Alright, now lets just get into the tutorial before I ramble anymore!


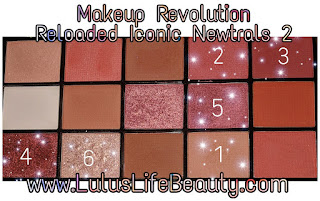
Starting out this makeup look I primed my eyelids with my foundation this time. Last time I used a thin layer of concealer and it worked well. I just felt like being lazy, while also preserving my concealer. Ya girl is broke and has to save money where I can. Starting with shade 1, a soft peach shade, I buffed it all the way from my outer corner almost to the inner corner. I also brought it pretty high up to counteract my hooded lid situation. Next up I took shade 2, a rusty medium brown and brought it through the crease again, a little lower and not as far in. I don't was to close off the eyes and make them look smaller than they already are. Do you see the pattern yet? Each shade I use I keep it a little lower and bring it in a little less to the inner corner. Which is exactly what I did with shade 3, a darker burnt orangey brown. On my lid I used shade 4, a light metallic pink, and I used my finger to press the shade onto my lid for maximum pigment. It turns out super soft and glowey looking. Which is why I brought it into the inner corner and inner third of the lower lash line. The outer two thirds of the bottom lash line is shade 2, the warm medium orangey brown. On my brow bone is my face highlight shade.

Thank you so much for stopping by and checking out this makeup tutorial. I love all of the warm burnt orange tones this time of year and I can't stop using them!! If you enjoyed this look, let me know in the comments down below and don't forget to follow me on instagram to see more of my life and some looks I don't always blog about. I have some that are basic boring looks and i'll share them over there!


Products used:
Eyes:
Makeup Revolution; The Newtrals 2
Maybelline; Great Lash; Waterproof
Essence Black Pencil Liner
Broadway Beauty Eyebrow Pencil; Brown / Black
BH Cosmetics black pen liner

Face:
[My foundations are mixed evenly.]
Maybelline Fit Me Matte + Poreless Foundation; 120
Revlon ColorStay Foundation; 200
Makeup Revolution; Conceal & Define Full Coverage Conceal & Contour, C3
Makeup Revolution; Lace Baking Powder
Elf Contour Kit
Blush; [self made]
Mario Badescu; Facial Spray With Aloe, Herbs and Rosewater

Highlight: 
Makeup Revolution; Fierce As Fire, White Highlight Shade

Lips:
J Cat Beauty; Lipfinity Matte Lip Gloss; Champagne Buzz
[With the metallic lid shade patted on]


Brushes / Tools:
Real Techniques, Miracle Complexion Sponge
Pueen Large Powder Brush
Pueen Angled Blush Brush
Generic Flat Packing Brush
Generic Brand Fan Brush
Generic Flat Shader Brush
Generic Natural Fiber Blending Brush

Find me elsewhere: 
Youtubehttps://www.youtube.com/user/LINDAxHELLA
Twitterhttps://twitter.com/Luluslife_blog 
Instagramhttps://www.instagram.com/lindaxhella/ 
Facebookhttps://www.facebook.com/Lulus-Life-Blog 
Pinteresthttps://www.pinterest.com/lindaxhella/pins/ 
Tumblrhttp://lindaxwoods.tumblr.com/


Fiery Half Cut Crease Tutorial

Fiery Half Cut Crease Tutorial
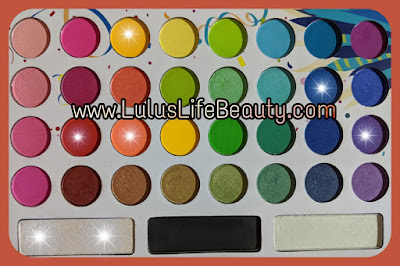
Hello everyone and welcome back to my blog! Today what I have for you is this beautiful warm orange, yellow, and red half cut crease with a blue and purple lash line. I wanted to do a contrasting color scheme on the lower lash line for a pop of some different colors and creativity. To achieve this look I used my BH Cosmetics "Take Me Back To Brazil" palette. This palette is mostly mattes and has some shimmery shades in it. At this point I think I have used off of the shadows in this palette and they're all pigmented and blendable. For today's look in particular I used all matte shades, except for when I cut the crease, did the brow bone and the bottom lash line shades did have some shimmer to it. The blue and purple don't have much of a sheen on the eye, but there are a few specks of sparkle.


Fiery Half Cut Crease Tutorial
Getting started with this tutorial, I did all of my face makeup first and then did the eyes, which is not what I normally do. I'm not the type to bake my under eye really, But I do leave some extra setting powder under my eyes in case of any fallout. Starting out with some eyeshadow primer and setting it with my setting powder. I then went in the bright Yellow shade with a fluffy natural fiber blending brush and blended the yellow through the crease, all the way to the inner corner and almost to the brow bone leaving space for a highlight.With the same brush I took the bright Orange and started buffing it into the Yellow in a circular motion bring it mostly into the inner corner, but not too far. I wanted to keep my eyes more open looking and didn't want to put too much color there. With the same brush again, I took the red and patted and blended it a little, just in the outer third corner of the eye, bringing it down slightly so I could connect the lower lash line shadows into the red. Using my foundation and a flat cream shadow brush, I cut the inner half of my lid and backed on the highlight shade, blending it slight back to get rid of harsh lines. On a flat tapered eyeshadow brush I went in with the Blue and ran it in the outer third of my bottom lash line. Picking up the Purple I blended it from the Blue to the inner third of the eye. Using the highlight shade that has the pink reflect, I ran it on the inner third of the bottom lash line, on the inner corner and brow bone. Finishing up the eye look, I lined my upper waterline with black to make my lashes look thicker, and I put white on the bottom waterline to open the look of my eyes. I then added my favorite mascara!

Thank you so much for stopping by and reading my blog post today, I appreciate your time and hope you love this look. Comment down below and suggest some tutorials, or reviews you might want to see from me! Below here I will have all of the products I used listed as well as the brushes and tools used. Down below you will find all of my social media links including my YouTube channel! Please consider subscribing and watching some of the videos I have posted! I have a few up so far and I'm wanting to do some more!
Xoxo Lulu


Products:
Eyes:
Hard Candy Eyeshadow Primer
BH Cosmetics; Take Me Back To Brazil palette
Maybelline The Rocket Mascara; Waterproof; Black
Essence Kajal Black Eye pencil
L.A. Colors retractable White eyeliner
Elf Brow Kit; Light
Elf Clear Brow and Lash Mascara

Face:
Maybelline Baby Skin Instant Pore Eraser
Revlon Colorstay Combo/oily Skin foundation; 200 Nude
Maybelline, Fit Me, Matte & Poreless; 110 Porcelain
Coty Airspun, Loose Powder; Naturally Neutral
Elf Contour Kit; Light
DIY Blush
Elf Mist & Set, Setting Spray

Lips:
Maybelline ColorSensational; 015 Born With It

Highlight:
Carli Bybel Original Palette; both lighter shades

Brushes / Tools:
Real Techniques Sponge
Pueen Large Powder Brush
Pueen Angled Blush Brush
Generic Brand Fan Brush
Generic Natural Fiber Blending Brush
Generic Flat Packing Brush
Generic Flat Angled Shader Brush
Generic Flat Cream Shadow Brush

Find me elsewhere:
Youtube: https://www.youtube.com/user/LINDAxHELLA
Twitter: https://twitter.com/Luluslife_blog
Instagram: https://www.instagram.com/lindaxhella/
Facebook: https://www.facebook.com/Lulus-Life-Blog
Pinterest: https://www.pinterest.com/lindaxhella/pins/
Tumblr: http://lindaxwoods.tumblr.com/


Plum Smokey Eye using Fifty Cent Eyeshadows!

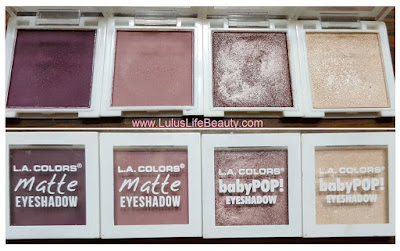
Plum Smokey Eye using Fifty Cent Eyeshadows!Hello everyone and welcome back to my blog! A while back when I was walking around our local Dollar General I discovered L.A. Colors had fifty cent single shadows! There weren't a lot to pick from, so I chose four shades I knew I'd get the most use out of. I chose a matte dusty mauve, a matte deep purple, a shimmery mauve color mixed with a warm brown tone, and the last one is a shimmery nude color. I'm not sure how many they actually had in store, most of the stuff was already picked over and some had been broken and thrown back on the display. They also had some mini glosses and fat liner / shadow pencils. I didn't use those today but they were decent for being so cheap. Right now I can tell you the shadows were pigmented, soft and blendable. The metallic shades were pretty decent just alone, but I did wet the lid shade for that metallic pop of color. Now lets get into the tutorial briefly!


Plum Smokey Eye using Fifty Cent Eyeshadows!
Today's tutorial is accompanied by a YouTube video again like I did a few weeks ago. I'm really liking filming and hope you're enjoying the videos as well. Starting out today's look I did all of my face makeup first and then moved onto the eyes. I primed with foundation and primer, I don't know why. I just felt like it lol, I set the lids with my setting powder for a crease free, blendable surface. This look ended up being super simple to do. I went in with the light mauve shade through the crease, placing down a munch of color to blend the dark purple into. I kept the darker purple in the outer third of my eyelid and brought it in a little further, just in the crease for depth. On the lid I took the metallic purple-ish brown and packed it all on the inner two thirds of the lid. I then decided to wet it to get more of the metallic finish! I took the shimmery nude color all in the inner corner and on my brow bone. The bottom last line is the two matte shades ombre'd out for a smooth transition, along with the shimmery nude on the lower inner corner / bottom lash line area.

I hope you loved today's tutorial and video as much as I do, it was a super easy and fun look to do. I would recommend picking up some of these shadows if you happen to come across them! Let me know if there is anything you want to see my try and test out on my channel and I'll try to make that happen! Down below is all of the products I used today including the tools and my social media links! If you could Subscribe to my YouTube and follow on Instagram, I'd appreciate that! I'm trying to hit 1,000 subs by the end of this year!!
Xoxo Lulu


Products;
Eyes:
Hard Candy Eyeshadow Primer
L.A. Colors Matte Eyeshadow; Secret
L.A. Colors Matte Eyeshadow; Crushed
L.A. Colors BabyPOP! Eyeshadow; Brownie
L.A. Colors BabyPOP! Eyeshadow; Nude Shimmer
Maybelline The Rocket Mascara; Waterproof; Black
Essence Kajal Black Eye pencil
Broadway Beauty Eyebrow pencil; Black / Brown
Elf Clear Brow and Lash Mascara

Face:
Maybelline Baby Skin Instant Pore Eraser
Revlon Colorstay Combo/oily Skin foundation; 200 Nude
Maybelline, Fit Me, Matte & Poreless; 110 Porcelain
Coty Airspun, Loose Powder; Naturally Neutral
Elf Contour Kit; Light
DIY Blush
Elf Mist & Set, Setting Spray

Lips:
Maybelline ColorSensational; 015 Born With It

Highlight:
Carli Bybel Original Palette; both lighter shades

Brushes / Tools:
Real Techniques Sponge
Pueen Large Powder Brush
Pueen Angled Blush Brush
Generic Flat Packing Brush
Generic Brand Fan Brush
Generic Flat Shader Brush
Generic Natural Fiber Blending Brush

Find me elsewhere:
Youtube: https://www.youtube.com/user/LINDAxHELLA
Twitter: https://twitter.com/Luluslife_blog
Instagram: https://www.instagram.com/lindaxhella/
Facebook: https://www.facebook.com/Lulus-Life-Blog
Pinterest: https://www.pinterest.com/lindaxhella/pins/
Tumblr: http://lindaxwoods.tumblr.com/


Pastel Dreams

Hello everyone and welcome back to my blog! Today's makeup tutorial is in video format! I hope you enjoy it and let me know if you like the idea of adding videos in with they tutorials! This night I sat down and just filmed, I don't know why or what inspired me. But I just went with it. I'm not entirely happy with the fact my camera wouldn't focus on products! I'm still really new at filming and editing, so I have to learn on my own how to take separate product shots and add them in and transitioned smoothly.


Thank you for stopping by and checking out this post. I hope you love this look. I know I do! If you have any video suggestions, let me know! I'm happy to try new looks! As always products are listed down below with all of my social media links!
Xoxo Lulu


Products used today.
Eyes:

BH Cosmetics Take Me Back To Brazil palette
Essence Kajal Eye Pencil, Black
Maybelline The Rocket Mascara, Waterproof in Black
Broadway Beauty eyebrow pencil, brown / black

Face: (My foundation is mixed half and half in the bottle)
Revlon Colorstay Foundation in 200
Maybelline Matte and Poreless in 120
Coty Airspun Face Powder, Naturally Neutral
Elf Contour Palette, light
E.L.F. Cosmetics Makeup Mist & Set

Highlight: Carli Bybel palette

Lips: NYX Butter Gloss, Maple Blondie

Brushes / Tools:
Real Techniques Sponge
Generic Flat Top Foundation Brush
Pueen Large Powder Brush
Pueen Angled Blush Brush
Generic Flat Packing Brush
Generic Brand Fan Brush
Generic Flat Shader Brush
Generic Natural Fiber Blending Brush

Find me elsewhere:
Youtube: https://www.youtube.com/user/LINDAxHELLA
Twitter: https://twitter.com/Luluslife_blog
Instagram: https://www.instagram.com/lindaxhella/
Facebook: https://www.facebook.com/Lulus-Life-Blog
Pinterest: https://www.pinterest.com/lindaxhella/pins/
Tumblr: http://lindaxwoods.tumblr.com/

Fuschia Rush Makeup Tutorial; Makeup Revolution

Makeup Revolution Iconic Newtrals 2
Hello everyone and welcome back to my blog! Today I have this beautiful tutorial to share with you. I am so obsessed with this look. It’s bright, shiny and stunning. Not to mention the pallet I used today, is $7.00…. Yes, seven dollars. The eyeshadows are all super pigmented, buttery and blend like a dream. I have no clue why I don’t use it more often. Makeup Revolution kills it with their palettes! The palette I used today is their Reloaded Iconic Newtrals 2. I bought it from Ulta a few months back and I’m so happy with my purchase. There’s 11 matte shadows (some look like they have shimmer, but it doesn’t show on the lid) and there are 4 buttery almost metallic shades. Okay, enough obsessing over this palette and let’s get into this tutorial!
Makeup Revolution Iconic Newtrals 2


To start this look, I did all of my face makeup first, so I primed and set my lids with my foundation and setting powder. Everything is listed down below as always. Since my lids were already set, I went in with the shade I marked as 1. This is a light warm tan color, I always blend higher that’s your “supposed to” because I have hooded eyes. With shades 2 and 3, I did the same thing and went in my crease with them. Keeping each darker shade slightly lower than the one before. Shade 2 is a pure rusty orangey red. Shade 3 is a darker brick red. I kept shade 3 more towards the outer corner. Now for the metallic buttery shades. I literally used my fingers to apply them at first. I put shade 4 just on the outer third, it’s a dark burgundy almost brick color. Shade 5 I put from the inner corner all the way to shade 4 and patted them together to blend them. Shade 5 is probably my favorite eyeshadow in this palette, it’s a hot pink / fuschia color that is so stunning and blinding! To soften up all the edges, I took a little of the lid shades and patted the edges out and also brought them on the lower lash line. For the inner corner and brow bone, I used shade 6, a pale nudey pink that’s super glowy.


Makeup Revolution Iconic Newtrals 2 That’s it for today’s makeup tutorial! I had a lot of fun with this one. I dumped a bunch of makeup on the living room floor and sat there and just played in makeup. I haven’t done something like that in a long time. It’s my happy place, some of y’all know I have some serious anxiety and take medicine for it. I still get anxious, panicked, I freak out inside. But when I sit down with makeup and focus on something I love doing so much, it calms me. I feel okay and I feel normal. Some people don’t get it. But hey, it’s for me to get and some to understand. Not everyone gets what I’m going through daily, if you do then hey, let’s chat in the comments! Thanks for stopping by, I appreciate you.
Xoxo, Lulu.

PS: Enjoy the narcissistic snapchat filter :)


Products used today.
Eyes:
Makeup Revolution Iconic Newtrals 2
Essence Kajal Eye Pencil, Black
Maybelline The Rocket Mascara, Waterproof in Black
Broadway Beauty eyebrow pencil, brown / black
BH Cosmetics, BH Liquid Eyeliner, Black
Ardell Wispies False Lashes
Duo Lash Glue

Face:
Bare Minerals Custom shade Foundation
Coty Airspun Face Powder, Naturally Neutral
Elf Contour Palette, light
E.L.F. Cosmetics Makeup Mist & Set
Blush, it's one I made myself!

Highlight:
BH Cosmetics Carli Bybel palette, (the two lighter highlights)

Lips:
La Colors Matte Liquid Lipstick, Vixen

Brushes / Tools:
Real Techniques Miracle Complexion Sponge
Pueen Large Powder Brush
Pueen Angled Blush Brush
Pueen Flat Shader Brush
Elf Defining Eye Brush
Elf Eyeshadow Brush
Elf Flat Contour Brush
Generic Brand Fan Brush
Generic Blending Brush
Generic Natural Fiber Blending Brush

Find me elsewhere:
Youtube: https://www.youtube.com/user/LINDAxHELLA
Twitter: https://twitter.com/Luluslife_blog
Instagram: https://www.instagram.com/lindaxhella/
Facebook: https://www.facebook.com/Lulus-Life-Blog
Pinterest: https://www.pinterest.com/lindaxhella/pins/
Tumblr: http://lindaxwoods.tumblr.com/


Navy Smokey Eye

Navy Smokey Eye


Hello everyone and welcome back to my blog! Today I had a really fun idea. I don’t know if anyone has done this or not before and it sounded like an awesome idea… I let my eleven year old daughter Trinity pick my eyeshadow colors. I wasn’t sure how this would go, she can be kind of crazy lol. Now she didn’t pick a matte all over color or a crease color, so I used my setting powder and my contour cool brown shade. Everything worked out in the end, even though I has some issues blending out the navy eyeshadow. I’ll go into the details when it comes to that part of the tutorial. Let’s get started!

Starting out this makeup look today, I primed my eye lids and set them with my setting powder. Like I said, my daughter did not pick out any matte or neutral colors, so I had to make due with what I had lol. For my crease I took the cool toned brown contour color and built up a nice deep crease. I knew with the navy eyeshadow she picked, I’d need a darker crease to compliment the colors. With the navy eyeshadow, I wet my brush to apply it in the end. I tried it dry and it was looking more black and patchy than navy. This shadow isn’t sold anymore my Ulta, I got it in a holiday train case set. On the center of the lid, I took my ring finger and packed on the color Deep End. This shadow is a deep emerald green with a holographic glitter in it. I tried it with a brush and it went everywhere. So using my finger was the only option, and there was still fallout because it is a glitter and I don’t have glitter glue. Over top of that I went in with a green from the Take Me Back To Brazil palette, the emerald wasn’t popping against the navy like I wanted it to. Adding the green on top was just what this look needed. I ran a little under my bottom lash line along with the navy in outer edge. 

For the rest of this makeup, I did my face like a always do. If you would like to see how I do my face makeup, I’ll link my latest makeup tutorial down below. It was a mermaid inspired look. A lot of the products will be the same. If anything is different, don’t worry I’ll have a full list down below of all my makeup products used in today’s tutorial, along with my brushes and tools. I will have all of my social media links down there too if you feel like following me! I’d love if you followed me and commented and let me know you came from my blog!
Xoxo Lulu

Little Mermaid Makeup Tutorial

Products used today.
Eyes:
Hard Candy Eyeshadow Primer
BH Cosmetics Take Me Back To Brazil palette (1 green shade)
Ulta Beauty Glitter Eye Top Coat, Deep End
Ulta Beauty Eyeshadow, Sapphire
Essence Kajal Eye Pencil, Black
Maybelline The Rocket Mascara, Waterproof in Black
Broadway Beauty eyebrow pencil, brown / black
Elf Clear Brow Gel
Ardell Wispies False Lashes
Duo Eyelash Glue

Face:
Maybelline Pore Eraser Primer
Bare Minerals Custom shade Foundation
Makeup Revolution Liquid Highlight, Champagne
Coty Airspun Face Powder, Naturally Neutral
Elf Contour Palette, light
E.L.F. Cosmetics Makeup Mist & Set
Blush, it's one I made myself!

Highlight:
Makeup Revolution Liquid Highlight, Champagne

Lips:
J Cat Beauty Kiss proof matte liquid lipstick, Champagne Buzz

Brushes / Tools:
Real Techniques Miracle Complexion Sponge
Pueen Large Powder Brush
Pueen Angled Blush Brush
Pueen Flat Shader Brush
Elf Defining Eye Brush
Elf Eyeshadow Brush
Elf Flat Contour Brush
Generic Brand Fan Brush
Generic Blending Brush
Generic Natural Fiber Blending Brush

Find me elsewhere:
Youtube: https://www.youtube.com/user/LINDAxHELLA
Twitter: https://twitter.com/Luluslife_blog
Instagram: https://www.instagram.com/lindaxhella/
Facebook: https://www.facebook.com/Lulus-Life-Blog
Pinterest: https://www.pinterest.com/lindaxhella/pins/
Tumblr: http://lindaxwoods.tumblr.com/

Cranberry Smokey Eye

Cranberry Smokey Eye


Cranberry Smokey Eye
Hello everyone and welcome back to my blog! Today I thought I'd share with you this beautiful Cranberry makeup look I created. I'm using all drugstore / drugstore priced items! The eyeshadow palette I used is the Makeup Revolution Redemption 3 palette. It's almost an exact dupe for the Urban Decay Naked 3 palette! I personally can't afford the Urban Decay palette, but it's good to know there's an affordable dupe out there for us makeup lovers on a budget! For how I did my base makeup, I have a foundation routine linked Here. It will include everything I use, products, tools, and how I apply it. 

Cranberry Smokey Eye
Since this eyeshadow palette doesn't have any names, I'm going to reference the names from the Urban Decay palette. I primed my eyelids with the Hard Candy Eyeshadow Primer. I then set it with the shade Strange to set everything and create a smooth surface for blending. On a fluffy blending brush I went through the crease with the shades Limit & Nooner. I blended until there was no harsh lines or edges. To create a lot of depth in the outer third, I used a natural fiber blending brush and the shade Darkside. I buffed and blended adding a little at a time until it was the right amount of Smokey and dark, lol. For my eyelid I used a flat packing brush and the Maybelline Color Tattoo in Too Cool, from inner corner to two thirds of the way in. I then took a flat shader brush in the shade Buzz. It's a beautiful cranberry color. The cream shadow under helped it to pop and look more metallic. I packed and patted the shadow back to the outer corner to ensue soften edges. For the small wing, I used a small angled brush with setting spray and used the shade Darkside. I made a thin line from the mid lid to the outer corner and added a small flick.
Finishing the rest if my eye makeup, I used in my waterline the Rimmel Scandaleyes waterproof liner in Sparkling Black, Broadway Colors Lengthening Mascara in Black. On the bottom lash line I took a small blending brush and dipped into Darkside connecting where the edge of the wing is and brought it half way in. I then took the shade Buzz on the same brush and took it from the inner corner and blended it back into Darkside. That's it for the eyes!

Thank you so much for checking out this tutorial. I hope you liked this eye look, if you did let me know! I have all of the products I used today listed down below, including the tools I used. Don’t forget to share this post and follow me on social media! Links below!
Xoxo Lulu


Products used today.
Eyes:
Hard Candy Eyeshadow Primer
Makeup Revolution Iconic 3
Maybelline Color Tattoo, Too Cool
Rimmel Scandaleyes Waterproof, Shimmering Black Liner
Broadway Color Lengthening Mascara, Black
Broadway Beauty Eyebrow pencil, Black / Brown

Face:
Maybelline Baby Skin Poreless Primer
Revlon Colorstay Foundation, 200
Maybelline Matte n Poreless Foundation, Porcelain
Coty Airspun Face Powder, Naturally Neutral
NYC Bronzer, Sunny
E.L.F. Cosmetics Makeup Mist & Set
Blush, it's one I made myself!

Lips:
Nothing today, I couldn’t find one I liked!

Brushes / Tools:
Real Techniques Miracle Complexion Sponge
Pueen Large Powder Brush
Pueen Angled Blush Brush
Pueen Flat Shader Brush
Elf Defining Eye Brush
Elf Eyeshadow Brush
Generic Brand Fan Brush
Generic Blending Brush
Generic Natural Fiber Blending Brush

Find me elsewhere:
Youtube: https://www.youtube.com/user/LINDAxHELLA
Twitter: https://twitter.com/Luluslife_blog
Instagram: https://www.instagram.com/lindaxhella/
Facebook: https://www.facebook.com/Lulus-Life-Blog
Pinterest: https://www.pinterest.com/lindaxhella/pins/
Tumblr: http://lindaxwoods.tumblr.com/


Popular Posts