Showing posts with label Wet n Wild. Show all posts

James Charles Palette | Skip & Artistry Tutorial

James Charles Palette | Skip & Artistry Tutorial


Hello everyone and welcome back to my website! Today I have another makeup tutorial for you in the form of a YouTube video! I have been really enjoying filming and I hope you're enjoying the videos and update in content. I'm sorry I keep using the new James Charles palette, but IT'S SO GOOD!!!!! I will try to switch up some more products for the next look and probably film that as well. As much as I love writing, i've been finding filming so much fun. I bet you're enjoying being able to visually see how i'm doing my makeup, rather than reading. If you prefer to read, rather than watching a video, let me know in the comments down below! I'm new to filming and editing so just give me some time to get better. I just discovered how to add text to the clips. I'm using Windows Movie Maker, It's simple and free. I'll eventually upgrade to something with more effects and pizzazz!
Xoxo Lulu


 Here I have all of the shades that I used, Marked with little  purple hearts for reference!

Products used today.
Eyes:
Wet n Wild Photofocus Eyeshadow primer
Morphe x James Charles Palette
Essence Kajal Eye Pencil, Black
Broadway Beauty eyebrow pencil, brown / black
Maybelline Great Lash Mascara; Clear (Brows)
Maybelline Great Lash Mascara; Waterproof; Black

Face:
Nivea Creme (For moisture and primer) (before recording)
Wet n Wild Photofocus Foundation; Nude Ivory
Makeup Revolution Conceal & Full Coverage Concealer; C3
Makeup Revolution Baking Powder; Lace
Elf Contour Palette
Ulta Beauty Blushes; Tiger Lily & Flush
Mario Badescu; Facial Spray With Aloe, Herbs and Rosewater

Highlight:
Wet n Wild; Mega Glow, Precious Petals

Lips:
Maybelline Color Sensational, Romantic Rose

Brushes / Tools:
Generic Natural Fiber Blending Brush
Generic Flat Small Cream Brush
Generic Blending Brush
Real Techniques Foundation Sponge
Pueen Large Powder Brush
Pueen Angled Blush Brush
Elf Highlighting Brush

Soft Green Smoky Eye

Soft Green Smoky Eye


Hello everyone and welcome back to my blog! Today is December first and I am excited and ready for the future seasonal looks! Today I decided to do a mostly drugstore look featuring the Wet N Wild Comfort Zone palette. Focusing mainly on the pretty green in this palette. I am not use to using shades of greens or blues. This a fun little step out of my personal comfort zone, lol. I’m thinking next post is going to be a silvery sort of look. What do you guys suggest I do next? Leave me some suggestions down below! Now let’s get started!


To start out this look, as usual I used my favorite eyeshadow primer, but I didn’t set it this time. I really wanted the pigments to stick and be very vibrant without wetting my brush. For my lid share I went it in with frosty pale green shade and packed it on from inner to outer corner. The rest of my lid I used the creamy shimmer shade, it has some chunky flakes in it, but they aren’t very noticeable. It gives more of a soft sheen to the brow bone. For the crease I used the golden bronze and took it from the outer corner and bringing it thinner towards the inner corner. I didn’t being it all the way in, if I had it would of made my eyes look smaller. To deepen up the very outer V, I took the black shadow that has a very fine bronze shimmer and blended a tiny bit out in the outer edge of the shadow. One thing to note, these shadows are like butter! They are so pigmented and blend like a dream. This is a $5.00 eyeshadow palette that’s just as good, of not better than some expensive palettes!


Alright guys, that’s how I did the eyeshadow! Thank you so much for checking out this tutorial, I hope you love this look as much as I do. I know I say that a lot, but if I didn’t like a look, I wouldn’t blog it. Blogging it’s self is starting to become a challenge with any money coming in. In order for us to get paid, we rely on how long ads are displayed and clicks. Now I’m not asking for you to click on ads, but know if you do, they are not spam. I only use reputable ad agencies.


Products used today.
Eyes:
Hard Candy Eyeshadow Primer
Wet n Wild Comfort Zone palette
Broadway Beauty Eyebrow pencil, Black / Brown
Broadway Color Lengthening Mascara, Black
Rimmel Scandaleyes Waterproof pencil liner, Sparkling Black

Face:
Maybelline Fit Me Matte + Poreless Foundation, Porcelain 110
Dermacol Foundation Cover, 210
Ulta Beauty, Full Coverage Liquid Concealer, Waterproof Light Cool
Coty Airspun Face Powder, Naturally Neutral
NYC Bronzer, Sunny
E.L.F. Cosmetics Makeup Mist & Set

Lips:
Shaaanxo Palette with BH Cosmetics, second darker nude shade

Brushes / Tools:
Real Techniques, Miracle Complexion Sponge
Generic Flat top Foundation brush
Pueen Large Powder Brush
Pueen Angled Blush Brush
Elf Defining Eye Brush
Elf Eyeshadow Brush
Generic Brand Fan Brush

Find me elsewhere:
Youtube: https://www.youtube.com/user/LINDAxHELLA
Twitter: https://twitter.com/Luluslife_blog
Instagram: https://www.instagram.com/lindaxhella/
Facebook: https://www.facebook.com/Lulus-Life-Blog
Pinterest: https://www.pinterest.com/lindaxhella/pins/
Tumblr: http://lindaxwoods.tumblr.com/


Wet n Wild Petal Pusher

Wet n Wild Petal Pusher TutorialLet’s throw things back to 2011, when one of my favorite Wet n Wild palettes came out, Petal Pusher! This week I’m doing a polar opposite of last week and doing a light spring look. I’m going to utilize the right “brow bone” color. I honestly do not consider it a brow color. It’s a frosty metallic pink! Since metallic eyeshadow looks are on trend, why not do a tutorial using one of my only metal looking shadows. This palette does not have a matte nude shade, so I’ll be using the other brow bone color anyway! I hope you love this look as much as I do!


Wet n Wild Petal Pusher
To start out the eyes, I use my trusty Hard Candy Eyeshadow primer I always use. It never creases on me and has a light nude tint to it, there’s no color concealing to. To set the primer I took the left brow bone color all over the lid to insure the look wouldn’t crease before I got shadows on. For my lid color I used the right brow bone color and packed on a little at a time to build up the opacity and metal look. I could have done it wet, but that always feels weird to me, lol. After I had the lid color as intense as I wanted, I started blending it up in the crease using a little of the right lid shade. Bringing in that soft light purple really helped define the crease and blend things out easily. To darken up the outer corner I used the left crease color lightly just to add more definition. For the bottom lash line is used a little of the of the same darker purple crease color and on the inner half ad inner corner I used the shade put on my eye lids.

Wet n Wild Petal Pusher Tutorial

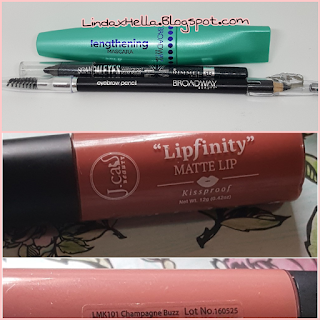
Broadway Beauty Eyebrow pencil, Black / Brown, Broadway Colors Lengthening Mascara in Black, J Cat Beauty Lipfinity Matte Lip, Champagne Pop,Finishing everything off I did my face makeup the same way I have it in my drug store foundation routine. I didn’t use any eyeliner for once. But for mascara and brows I used two new products my boyfriend picked up randomly for me at the store one evening. The brow pencil is Broadway Beauty Eyebrow pencil in Black / Brown, it’s kind of hard and not crazy pigmented. So I like it a lot. For mascara I used the Broadway Colors Lengthening Mascara in Black. The formula has little fibers in it doesn't seem to flake or smear when I sweat. The wand has a curve on the end, it isn’t too weird to be honest. For my lips I put on my J Cat Beauty Lipfinity Matte Lip in Champagne Pop! It’s my favorite matte lip color. To finish I sprayed my face with the Elf setting spray, and that’s it! It’s so simple and pretty and perfect for!


I hope you enjoyed this post and get inspired to have a little fun with some soft spring colors!

Xoxo,
Lulu.


Popular Posts