Showing posts with label Makeup brushes. Show all posts

Updated Makeup Brush Cleaning!

Foundation Brush before and after
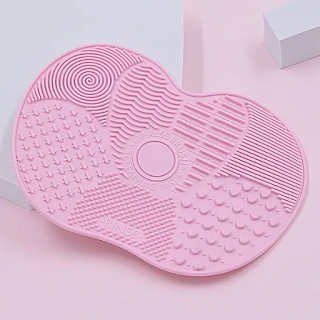
Hello Everyone and welcome back! Today I have my updated makeup brush cleaning post! Over the years I've simplified a lot of what I do and how I clean my makeup brushes! All you need is your favorite antibacterial soap and a brush cleaning mat! If you don't have one of the mats, you can use your hand to agitate the bristles. My choice of antibacterial soap, is Dawn! It's been my go to for years now. When washing the brushes, use a more gentle hand but you can tell by pushing on the bristles how much pressure is needed. Run the brush under water and use a small amount of soap and scrub the bristles in circular motion to work the product out. Rinse and repeat if needed. Some pigments can stain! Once you fully rinse the brush out, gently squeeze out excess water and set aside to dry! I have posted a video of the process on all of my social media pages!


If your a visual learner, You can find the links to everything here;

Things you need:
- Dirty Makeup Brushes
- Antibacterial Soap (Dawn)
- Silicone Brush Mat (Exact one here)
- A bath towel to lay them out on after

Eyeshadow Brushes before and after


Helpful tips:
- Make sure you use lukewarm water.
- If it's too hot, you risk melting the glue and your brushes will fall apart.
- If the water is too cold, I've noticed the bristles have a harder time getting clean. 
- Lay out a bath towel, roll it up on one end to create an elevated edge for the handles to rest on.
- Keep your brushes angled down so gravity helps push the water down and not into the bristles.


This is the exact one I have, you can get them a lot of places pretty inexpensive!
Silicone Mat, Makeup Brush Cleaning Mat

Thank you so much for stopping by! 
Make sure you follow me on Tiktok, Instagram, Facebook or Youtube! <3


BH Cosmetics Royal Affair Brush Set Review


Hello everyone and welcome back to my website! Today I have for you a review of the beautiful BH Cosmetics Royal Affair Brush Set! I’m going to go over the quality, price, and lots of other information you may need or want before buying them for yourself. I’ll also touch briefly on some issues people are having with shipping, wait time and my personal experience with those subjects.

This brush set includes 10 brushes, 4 face brushed and 6 eye brushes. The handles are plastic with a "Metalized Finish". Basically meaning they have a shiny chrome finish. They are weighted nicely and don't feel cheap at all. I love a good weight behind a brush, it shows they're made well. Here is a list of bullet points about the brushes, from their website with my own points added in as well. One thing I'm actually confused on is their statement "Metalized handles that assists in precise application", The finish has nothing to do with how well the brushes will or wont preform lol.


I've been seeing a lot of drama on their Instagram photo's of people being upset about them being charged double on accident on orders and shipping taking over a month for things to be shipped. Personally, nothing like this had happened to me and when asking a few people who've had these issues, it was during the holiday season when they were getting a lot of orders. I'm assuming it was a computer error and due to high volume of orders, things were a bit late to be shipped. I think anytime someone orders online around the holiday seasons or when there's a big sale (on any website) the should keep into consideration that there's a lot of others shopping too.


Cost:
  • $25.00 regular price
  • On sale for $17.50
  • 10 brushes at $25 is $2.50 a brush
  • Or $1.75 per brush, based on sale price

Their points:
  • Lush bristles create the perfect finish
  • Soft blend of synthetic hairs
  • Metalized handles that assists in precise application
  • Cruelty Free
  • Professional Quality
My Points:
  • Extremely Soft
  • Fairly inexpensive
  • Nicely Weighted
  • 3 Blending Brush Sizes!!!
  • Dense Bristles
  • Zero shedding
  • The Finish has a beautiful Gloss coating
Brush Listing:
  • Tapered Powder Brush
  • Large Chiseled Contour Brush
  • Large Flat Top Buffing Brush
  • Angled Blush Brush
  • Large Crease Blending Brush
  • Tapered Crease Blending Brush
  • Detailing Crease Blending Brush
  • Tapered Concealer Brush
  • Flat Shader Brush
  • Angled Liner Brush


In conclusion, I highly recommend these brushes. The flat top foundation brush works like a dream! All of the brushes are amazing, but I've been looking for a good foundation brush for a while now. They're amazingly soft, have not shed one bit or gotten out of shape. The fat that there's 3 blending brushes is amazing! They are all different sizes, and help you create such a beautiful blend! Right now they are on sale! I got them on sale a long with 3 angled Brush holders in a Faux Leather, Vegan, Marble Pattern. They're really good quality and super pretty. They're normally $6.00 each, but on sale for $4.50 each!

Thank you so much for stopping in a checking out my review. If you enjoyed make sure you leave a comment and have a chat down in the comment section! I've been trying to pump out more and more content each week and I hope you're all enjoying it! I have a new makeup tutorial coming up on Saturday or Sunday! I can't wait to share it with you!
Xoxo Lulu


Find me elsewhere:
Youtubehttps://www.youtube.com/user/LINDAxHELLA
Twitter: https://twitter.com/Luluslife_blog
Instagram: https://www.instagram.com/LulusLifeBeauty/
Facebook: https://www.facebook.com/Lulus-Life-Blog
Pinterest: https://www.pinterest.com/lindaxhella/pins/
Tumblr: http://lindaxwoods.tumblr.com/

James Charles Palette | Skip & Artistry Tutorial

James Charles Palette | Skip & Artistry Tutorial


Hello everyone and welcome back to my website! Today I have another makeup tutorial for you in the form of a YouTube video! I have been really enjoying filming and I hope you're enjoying the videos and update in content. I'm sorry I keep using the new James Charles palette, but IT'S SO GOOD!!!!! I will try to switch up some more products for the next look and probably film that as well. As much as I love writing, i've been finding filming so much fun. I bet you're enjoying being able to visually see how i'm doing my makeup, rather than reading. If you prefer to read, rather than watching a video, let me know in the comments down below! I'm new to filming and editing so just give me some time to get better. I just discovered how to add text to the clips. I'm using Windows Movie Maker, It's simple and free. I'll eventually upgrade to something with more effects and pizzazz!
Xoxo Lulu


 Here I have all of the shades that I used, Marked with little  purple hearts for reference!

Products used today.
Eyes:
Wet n Wild Photofocus Eyeshadow primer
Morphe x James Charles Palette
Essence Kajal Eye Pencil, Black
Broadway Beauty eyebrow pencil, brown / black
Maybelline Great Lash Mascara; Clear (Brows)
Maybelline Great Lash Mascara; Waterproof; Black

Face:
Nivea Creme (For moisture and primer) (before recording)
Wet n Wild Photofocus Foundation; Nude Ivory
Makeup Revolution Conceal & Full Coverage Concealer; C3
Makeup Revolution Baking Powder; Lace
Elf Contour Palette
Ulta Beauty Blushes; Tiger Lily & Flush
Mario Badescu; Facial Spray With Aloe, Herbs and Rosewater

Highlight:
Wet n Wild; Mega Glow, Precious Petals

Lips:
Maybelline Color Sensational, Romantic Rose

Brushes / Tools:
Generic Natural Fiber Blending Brush
Generic Flat Small Cream Brush
Generic Blending Brush
Real Techniques Foundation Sponge
Pueen Large Powder Brush
Pueen Angled Blush Brush
Elf Highlighting Brush

Rusty Grunge Glam Tutorial

Rusty Grunge Glam Tutorial


Hello everyone and welcome back to my blog! Today I felt like doing another Smokey eye. I don’t know what has gotten into me with loving these darker looks, but I’m really feeling myself in them lol. Today I went with a rusty red-ish orange and a black Smokey look. I dipped really lightly into the black since it’s so pigmented, I’ll get into that later in the tutorial. Today’s tutorial is using the BH Cosmetics palette Take Me Back To Brazil. When I get new palettes, I like to use them more than my others. It’s like anything else, new things are so much fun. This palette has so many endless looks you could do with it, and I’ve barely dipped my toes in the water lol. Alright guys, let’s get right into this tutorial!


Starting out this look, it was a complete mess to be honest. I had no idea what I was doing and I ended up with this rusty, sort of grunge look. To me it screams, clean grunge lol. I primed my eyelids with my usual primer and set it with my setting powder. On the lid I packed on the burgundy color all over, then picked up the red and started to blend that in too over the burgundy and up through the crease. On a flimsy fluffy brush, I picked up a tiny bit of black and lightly blended it and half way through the crease and in the outer third. This black is no joke, it’s so pigmented, be aware if your using this palette lol. After that, I picked up both of the red and burgundy shades and softened the edges on everything. I also brought them underneath the lashline to smoke it out. I added a winged liner, tight lined and lined my waterline in black. I had to add lashes to this look, it just wasn’t complete without them. The eyelids were too heavy not to add lashes and lots of mascara.


Thank you so much for checking out this makeup tutorial, I hope you like it and if you try it out, tag me on social media! I’ll have everything tagged down below, The products, brushes and social media links! If there’s any looks you want me to try or any colors you want to see me use, comment down below or tag me online. I’d love to chat with you guys and hear what you want to see.
Xoxo Lulu

Products used today.
Eyes:
Hard Candy Eyeshadow Primer
BH Cosmetics Take Me Back To Brazil palette
Essence Kajal Eye Pencil, Black
BH Cosmetics “BH Liquid Eyeliner”felt tip
Maybelline The Rocket Mascara, Waterproof in Black
Broadway Beauty eyebrow pencil, brown / black
Elf Clear Brow Gel
Ardell Wispies False Lashes

Face:
Maybelline Pore Eraser Primer
Bare Minerals Custom shade Foundation
Makeup Revolution Liquid Highlight, Champagne
Coty Airspun Face Powder, Naturally Neutral
Elf Contour Palette, light
E.L.F. Cosmetics Makeup Mist & Set
Blush, it's one I made myself!

Highlight:
Makeup Revolution Liquid Highlight, Champagne

Lips:
Maybelline ColorSensational, Born With It

Brushes / Tools:
Real Techniques Miracle Complexion Sponge
Pueen Large Powder Brush
Pueen Angled Blush Brush
Pueen Flat Shader Brush
Elf Defining Eye Brush
Elf Eyeshadow Brush
Elf Flat Contour Brush
Generic Brand Fan Brush
Generic Blending Brush
Generic Natural Fiber Blending Brush

Find me elsewhere:
Youtube: https://www.youtube.com/user/LINDAxHELLA
Twitter: https://twitter.com/Luluslife_blog
Instagram: https://www.instagram.com/lindaxhella/
Facebook: https://www.facebook.com/Lulus-Life-Blog
Pinterest: https://www.pinterest.com/lindaxhella/pins/
Tumblr: http://lindaxwoods.tumblr.com/


My Effortless Makeup Look!


When I have to run errands and I don't want to do a full face of makeup, this is my "go-to" look. I still use a fair amount of products, but it is a more natural everyday kind of look. It's for those days when I don't have the time or energy to "Beat my face to the gods". There are a few different eye looks I'll do, but this is my usual look. I hope you enjoy!


First things first, I always wash my face with a charcoal face wash and a normal wash cloth. I've noticed if I don't wash my face just before I do my makeup, it doesn’t sit right. I often have breakouts and dry skin around my nose and chin, so washing and rinsing my face well is always a must! The face wash I use is Biore Deep Pore Charcoal Cleanser, it's has a cooling feeling and does seem to work. It’s honestly really thick and has little black flecks of charcoal in it. If I leave it on for more than a minute or two, my face starts to tingle and feel warm. So I just wash it off and move on to my moisturizer. I have been using the Nicel Daily Repair with Vitamin A and Retinol for about three years. I always got it at Big Lots for less than two dollars, but I have not been able to find it the last few times I had been there. I have seen it on Amazon though! Before I start my makeup, I throw on my chap stick in the flavor Pumpkin Pie.


Now on to the actual makeup! I always do eyes first. No matter what I do, I always have fall out. I start by priming my eyes with the hard candy primer and I put down a matte creamy nude color all over by wet n wild in Brulee. It helps make the rest of the shadows blend better and even everything out. I use the Wet N Wild Pallet in Comfort zone. It has super soft, pigmented shadows. I take the warm pinky brown shade on my lids then put the warm brown / blue shifty one in the crease. It’s comparable to Mac’s Blue Brown pigment.


After that, I clean up the fall out and move on to primer and foundation. I mix one pump of my green redness relief elf primer in with two pumps of my covergirl foundation in shade 810. Mixing them like that seems to make my foundation stay on longer than normal. When I’m in a rush, and want my foundation to look natural, I blend it in with my hands. The coverage is still nice and looks so much more natural than if I use a sponge. If needed, I’ll add some extra foundation to any spots and my under eyes with my real techniques miracle complexion sponge. I do have pretty dark circles. After, I set everything with my coty Air spun loose face powder. I love how it smells, it reminds me of my grandma. I always add a Bronzer to the "classic 3" area, if I don’t I look washed out. I like to bronze up with the Wet N Wild Coloricon Contouring Pallet. It also has a matte highlight shade, which I sometimes use under my eyes if I need more brightening. My favorite Blush is my Avon blush in Classic aura. It’s a gentle mauve, and looks really flattering on my skin tone. For highlight, I use the one I made myself. I highlight my cheek bones and above my brow, the tip of my nose and my cupids bow.


Last thing I do is finish my eyes, lips and set everything. I put on Rimmel Scandleyes waterproof "sparkling black" eye liner. I put it in my water line and tight line. Then I use my holy grail Maybelline the rocket mascara in waterproof on my top and bottom lashes. I put on like one and a half coats. focusing on my top lashes. I lightly fill my brows and brush them out in with the Jordana Fabubrow eyebrow pencil in dark brown. Personally, it’s too warm for me, and I’m looking into getting a more ashy one. If you have any suggestions, let me know down below. I use my Elf Mist & Set to keep everything in place and while its drying, I put on some gloss. My favorite is Maybelline The Elixir Colorsensational in shade 90, Rose Redefined. It's one of those glosses that is super shiny and long lasting, but not sticky. It has a grandma smell I love!

Then I’m done! It usually takes me about fifteen to twenty minutes to do it all and feel a lot more confident going out and about. I do have a lot of acne, acne scars and redness on my cheeks that bother me. If I’m having a decent skin day I’ll just wear mascara, eye liner, fill my brows in lightly and wear some chap stick and call it a day. I’m going to have some photos of the products and me throughout the steps! I hope you’ve enjoyed this post and if you want me to do anymore like this with different looks, let me know down below!

Thank you all for reading!
Xoxo Lulu.


How I clean my makeup brushes!


My favorite way to clean my makeup brushes has got to be with organic virgin coconut oil and Dawn dish soap… A lot of people like to use olive oil, but I think it’s much harder to get out of the brushes and makes the task take a lot longer! Now let’s all be honest, how many of us actually clean our brushes out after we use them? Not me, that’s for sure! I don’t have time to do it and it’s not the most fun thing to do. Since I don’t do my makeup as often as I’d like, I only need to wash my brushes twice a month.


You know how putting organic virgin coconut oil in your hair is really good for you hair? Well, coconut oil contains lauric acid, and that’s been known to reduce candida, it fights bacteria, and awesomely enough it also creates a hostile environment for viruses. Are you starting to get why I use it do clean my brushes? It’s going to be a lot better for your skin if there’s any residue of it left in the bristles. When you use Dawn Ultra Concentrated dish soap, it removes all dirt and, oils and germs! If you’re wondering “Why use an oil if you’re going to be using soap anyway?”. Well simply put, it breaks down any powders stuck inside the bristles of the brushes and breaks down creams and liquids that contain oils. Then after you wash the brushes with soap to remove all of the makeup residue and oils. You always want the brushes at a downward facing angle after they have been washed. Always set them down so the water is being drawn down the length of the bristles and out towards the tips. Never set your brushes upright while they are wet. Doing so weakens the glue, rots the wooden handles and makes it a lot easier for bacteria to breed and mold to grow. Now that all of the details and basics have been mentioned, let’s get into explaining my process!

Here’s what you are going to need:
Virgin organic coconut oil.
Your preferred soap.
Your makeup brushes and sponges.
Some paper towels.
Last but not least, something to rest them on.
I usually use two hand towels, one rolled for height and one laid out.

You want to start with a small amount of coconut oil in a microwave safe dish. About a teaspoon worth for twenty or so brushes. Dampen them as you go in warm water, dip the end in a little bit of the oil and swirl the brushes on your hand, between your fingers and really work the oil into the brush. Once you have the oil worked in take your soap and put a drop on your hand and swirl and work the soap in on your hand, massaging the soap in and occasionally squeezing the brush. Repeat that step until the water runs clear. You do this with all of your brushes and sponges until everything is clean. Once you’re done, make sure to gently squeeze out ad much water as possible, then set up your brushes facing down to draw the water out. Let them sit for a few hours or up to a day and you are done!
This is by far the easiest way I’ve ever found for washing my brushes! I hope this post helped you and was informative! If you have any questions, let me know in the comments!


Xoxo
Lulu

Popular Posts