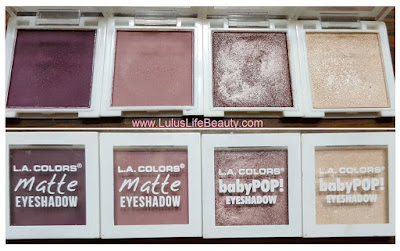
 Hello everyone and welcome back to my blog! A while back when I was walking around our local Dollar General I discovered L.A. Colors had fifty cent single shadows! There weren't a lot to pick from, so I chose four shades I knew I'd get the most use out of. I chose a matte dusty mauve, a matte deep purple, a shimmery mauve color mixed with a warm brown tone, and the last one is a shimmery nude color. I'm not sure how many they actually had in store, most of the stuff was already picked over and some had been broken and thrown back on the display. They also had some mini glosses and fat liner / shadow pencils. I didn't use those today but they were decent for being so cheap. Right now I can tell you the shadows were pigmented, soft and blendable. The metallic shades were pretty decent just alone, but I did wet the lid shade for that metallic pop of color. Now lets get into the tutorial briefly!
 I hope you loved today's tutorial and video as much as I do, it was a super easy and fun look to do. I would recommend picking up some of these shadows if you happen to come across them! Let me know if there is anything you want to see my try and test out on my channel and I'll try to make that happen! Down below is all of the products I used today including the tools and my social media links! If you could Subscribe to my YouTube and follow on Instagram, I'd appreciate that! I'm trying to hit 1,000 subs by the end of this year!!
Xoxo Lulu
Products;
Eyes:
Hard Candy Eyeshadow Primer
L.A. Colors Matte Eyeshadow; Secret
L.A. Colors Matte Eyeshadow; Crushed
L.A. Colors BabyPOP! Eyeshadow; Brownie
L.A. Colors BabyPOP! Eyeshadow; Nude Shimmer
Maybelline The Rocket Mascara; Waterproof; Black
Essence Kajal Black Eye pencil
Broadway Beauty Eyebrow pencil; Black / Brown
Elf Clear Brow and Lash Mascara
Face:
Maybelline Baby Skin Instant Pore Eraser
Revlon Colorstay Combo/oily Skin foundation; 200 Nude
Maybelline, Fit Me, Matte & Poreless; 110 Porcelain
Coty Airspun, Loose Powder; Naturally Neutral
Elf Contour Kit; Light
DIY Blush
Elf Mist & Set, Setting Spray
Lips:
Maybelline ColorSensational; 015 Born With It
Highlight:
Carli Bybel Original Palette; both lighter shades
Real Techniques Sponge
Pueen Large Powder Brush
Pueen Angled Blush Brush
Generic Flat Packing Brush
Generic Brand Fan Brush
Generic Flat Shader Brush
Generic Natural Fiber Blending Brush
Find me elsewhere:
Youtube: https://www.youtube.com/user/LINDAxHELLA
Twitter: https://twitter.com/Luluslife_blog
Instagram: https://www.instagram.com/lindaxhella/
Facebook: https://www.facebook.com/Lulus-Life-Blog
Pinterest: https://www.pinterest.com/lindaxhella/pins/
Tumblr: http://lindaxwoods.tumblr.com/


No comments:
Post a Comment